Why Settle for Store-Bought When You Can Make It Yourself?
Let’s be honest—store-bought coconut oil is everywhere, but how often have you wondered what’s really inside that jar? Additives, preservatives, or maybe even heat processing that zaps the good stuff? If you want real, unrefined, and all-natural coconut oil, the best way is to make it yourself. And guess what? It’s easier than you think.
This isn’t some complicated science experiment. With a few coconuts, a blender, and a little patience, you’ll have golden, fragrant coconut oil that beats anything on the shelf. Whether you’re whipping up your favorite dish or moisturizing your skin, homemade coconut oil gives you that clean, rich experience straight from nature.
What You’ll Need to Get Started
Before we dive into the how-to, gather these simple tools and ingredients:
- 3–4 mature coconuts (the older and browner, the better for oil content)
- Water
- A blender or food processor
- A large mixing bowl
- Cheesecloth or fine mesh strainer
- A spoon or spatula
- A clean jar or bottle for storage
That’s it. No fancy equipment. No chemicals. Just you, your coconuts, and a kitchen.
Crack It Open: Preparing the Coconuts
First things first—break open those coconuts. Use the back of a sturdy knife or a hammer to tap around the shell until it splits. Pour out the coconut water (don’t waste it—drink it or save it for smoothies).
Now comes the slightly tougher part: separating the white meat from the shell. Use a sharp knife or a dedicated coconut scraper. Rinse the meat under water to wash off any remaining husk bits.
Blend and Cream: Making Coconut Paste
Next, chop the coconut meat into small chunks. Toss them into your blender or food processor and add water to help the blending process. A good rule of thumb: 2 cups of coconut meat to 1 cup of water.
Blend until you’ve got a thick, milky, creamy mixture. This coconut paste is what you’ll use to extract the milk—and eventually the oil.
Milk the Coconut: Extracting the Liquid Gold
Place a cheesecloth or fine strainer over a large bowl. Pour the coconut paste into it and squeeze hard—really twist and press to get every drop of coconut milk out. This is the base of your oil, so don’t skimp on the effort.
If needed, repeat with the leftover pulp for a second round of milk extraction. The more liquid you get, the more oil you’ll yield.
Video : How to Make Coconut Oil at Home | creative explained
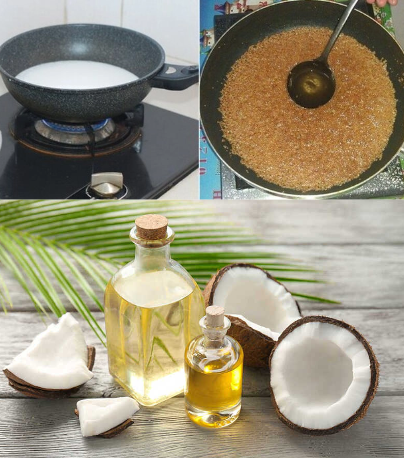
Let It Rest: Natural Separation Process
Now here’s where patience comes in. Leave the bowl of coconut milk at room temperature for about 24 hours. The magic will happen on its own—the oil starts to separate from the milk, forming a creamy, solid layer on top.
After a full day, pop the bowl in the fridge for a few hours. This step helps harden the creamy layer, making it easier to scoop out. That top layer? That’s your coconut cream—your soon-to-be oil.
The Final Step: Heat to Extract the Oil
Place the hardened coconut cream into a pan and heat it slowly over low heat. As it melts, you’ll notice the oil beginning to separate. Stir gently, and keep an eye on it. Let it simmer until the water content evaporates and you’re left with a golden, clear liquid.
Strain the warm oil through cheesecloth one last time to remove any solids. You’ve just made pure coconut oil from scratch.
Store It Like a Pro
Let the oil cool, then pour it into an airtight jar or glass bottle. Keep it in a cool, dry place—your pantry works great. Homemade coconut oil stays fresh for several months, but storing it in the fridge can extend its shelf life even more.
Why Homemade Coconut Oil Is a Game-Changer
So why go through all this effort when you could grab a jar off the shelf? Here’s why homemade wins every time:
1. Pure and Chemical-Free
You control every step. No preservatives. No weird additives. Just pure, clean oil straight from the source.
2. Packed With Nutrients
Homemade oil retains lauric acid, vitamins, and antioxidants—all of which are fantastic for your skin, hair, and immune system.
3. Multi-Purpose Goodness
From cooking crispy golden shrimp to moisturizing dry winter hands, this oil does it all.
4. Budget-Friendly and Eco-Friendly
You save money in the long run and skip the plastic packaging. It’s a win for your wallet and the planet.
5. The Smell. The Flavor. The Texture.
Trust us—once you use homemade coconut oil, you’ll notice the difference instantly. It’s aromatic, light, and deeply nourishing.
Pro Tips for Coconut Oil Perfection
- Choose brown, mature coconuts for the highest oil content.
- Avoid overheating during the final extraction—low and slow keeps nutrients intact.
- Use clean tools at every stage to prevent spoilage.
- Don’t throw away the leftover coconut solids! Use them in baking, smoothies, or as compost.
Video : Homemade coconut oil from scratch ft Buchymix turbo crush blender ✅🔥
Conclusion: Your DIY Coconut Oil Journey Starts Here
Making coconut oil at home isn’t just a kitchen project—it’s a return to simple, honest living. You get to skip the middlemen, reconnect with a natural process, and end up with something beautiful and useful.
Whether you drizzle it on veggies, rub it on dry elbows, or massage it into your scalp, this homemade coconut oil is a tiny luxury you made all on your own.
So grab some coconuts, clear a little counter space, and let nature do the rest. You’ll never look at that grocery store jar the same way again. 🥥✨


