Ever feel guilty tossing apple peels and cores into the trash? What if I told you those scraps could transform into something tangy, powerful, and crazy versatile? Enter homemade apple cider vinegar—a zero-waste, budget-friendly DIY that’s perfect for your kitchen, your health, and even your beauty routine. Let’s break it down, step-by-step, so you can start making your own ACV right at home.
Why Use Apple Scraps for Vinegar?
Think apple scraps are just trash? Think again. Those peels, cores, and bits you normally toss out are packed with nutrients, flavor, and natural sugars—exactly what you need for fermentation. Making vinegar from them isn’t just thrifty; it’s sustainable and smart.
Not only are you saving money and reducing food waste, but you’re also making something that supports gut health, adds zing to recipes, and works wonders as a natural cleaner or skincare product. And let’s be real—knowing what goes into your food (and what stays out) feels pretty empowering.
What You’ll Need to Get Started
This isn’t one of those fancy, ingredient-heavy recipes. In fact, you likely already have what you need:
- A generous amount of apple scraps (peels, cores, and any bruised bits—just avoid moldy ones)
- Filtered water (chlorine can mess with fermentation)
- Sugar (1–2 tablespoons per cup of apple scraps)
If you’re using organic apples, even better. No pesticides = a cleaner, healthier fermentation process.
Step-by-Step: Making Apple Cider Vinegar at Home
Let’s turn those scraps into a tangy, probiotic-rich vinegar. It’s easier than you think.
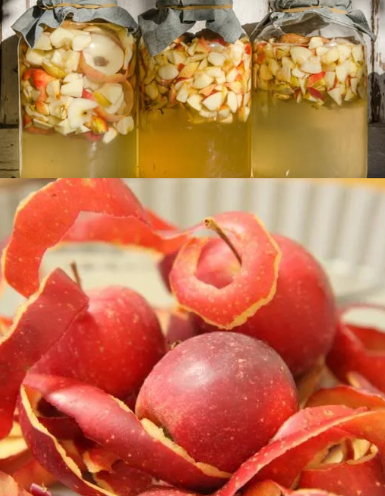
1. Collect and Prepare Your Apple Scraps
Start by saving your apple leftovers. Peels, cores, odd ends—it’s all good. If you don’t have enough in one go, stash them in a freezer bag until you’ve collected a solid batch. You’ll want enough to fill at least half a glass jar.
Video : 🍎Apple Scraps Cider Vinegar🍏
2. Add Water and Sugar
Place your apple scraps in a clean glass jar, filling it halfway. Pour in filtered water until the scraps are fully submerged. Now, stir in the sugar—this is what jump-starts the fermentation process by feeding the natural yeasts.
Tip: Use a wooden spoon to avoid reacting with the acidic mixture. And don’t skimp on the sugar—it’s vital to the transformation.
3. Cover It Right (No Metal Allowed)
Instead of sealing the jar with a lid, cover it with a clean cloth or paper towel, secured with a rubber band. This keeps bugs and dust out while letting the vinegar “breathe.” Never use metal—it can corrode and affect the taste.
4. Let the Magic Happen: Fermentation Begins
Now comes the waiting game. Place your jar in a warm, dark spot—like a pantry or cupboard. Stir it once daily to keep everything submerged and mold-free. Over the first 1–2 weeks, the natural sugars will turn into alcohol, and then into vinegar.
You’ll know things are going well when you catch a whiff of that sour, tangy scent. That’s the acetic acid doing its thing.
5. Strain Out the Scraps
After 1–2 weeks, it’s time to strain out the solids. Pour the liquid into a clean jar, discard the scraps, and recover the liquid with a fresh cloth. Now let it sit for another 3–4 weeks to deepen the flavor.
6. Taste Test and Bottle It Up
Once the vinegar smells and tastes like the ACV you know and love, it’s ready. Transfer it to a clean glass bottle with a tight-fitting lid. Store it in a cool, dark place, and enjoy for months to come.
Boom—your homemade apple cider vinegar is ready to use!
Pro Tips for Success
Want to make the best vinegar on the block? Keep these tips in mind:
- Always use clean jars and utensils to avoid contamination.
- Go organic when possible. The fewer chemicals, the better the flavor and safety.
- Be patient. Vinegar isn’t instant—it needs time to develop those signature notes.
- Don’t panic over cloudiness or sediment. That’s normal (and actually a sign of the good stuff—the “mother” of vinegar).
How to Use Your Homemade Apple Cider Vinegar
Once you’ve got your vinegar, the real fun begins. This stuff is crazy versatile. Here’s how to put it to work:
1. In the Kitchen
- Add a splash to salad dressings or marinades.
- Use in baking recipes that call for acid.
- Mix with water and honey for a tangy health tonic.
2. As a Natural Cleaner
- Combine with water in a spray bottle for a streak-free all-purpose cleaner.
- Use to disinfect cutting boards or deodorize sinks.
3. For Skin and Hair Care
- Dilute with water for a gentle face toner that helps balance pH.
- Rinse your hair with it after shampooing to boost shine and scalp health.
Seriously, once you start using it, you’ll wonder how you lived without it.
Video : How to make apple cider vinegar from apple scraps
Conclusion: From Waste to Wellness—It’s Time to Vinegar Like a Pro
Making apple cider vinegar from scraps is one of those rare DIYs that checks every box. It’s simple, sustainable, healthy, and satisfying. You’re reducing food waste, saving money, and crafting a product that supports your body, your home, and the planet.
So the next time you slice an apple, don’t throw out the scraps. Turn them into something magical—something that keeps giving long after the last bite. It’s not just vinegar. It’s a lifestyle upgrade in a jar.