Bean sprouts aren’t just a tasty crunch in your stir-fries and salads—they’re a nutrient-packed powerhouse you can grow right in your kitchen. While the store-bought variety is convenient, nothing beats the freshness, flavor, and satisfaction of harvesting your own. And here’s the best part: you don’t need a fancy setup or a garden. With just a few plastic bottles and some mung beans, you can have a steady supply of crisp, white sprouts in less than a week.
Let’s walk through exactly how to do it.
Why Grow Bean Sprouts at Home?
Store-bought sprouts may look fine, but they’ve often traveled long distances and sat on shelves for days. Growing them yourself ensures maximum freshness, better flavor, and higher nutrient content. Plus, it’s inexpensive, pesticide-free, and surprisingly fun.
What You’ll Need
- Green beans (mung beans are ideal)
- Warm water
- Three large plastic bottles (at least 5 liters each)
- One small bottle (for transferring beans)
- Drill or sharp object (for making holes)
- Towels (preferably damp)
- Knife or scissors (for cutting bottles)
Step 1: Prepare the Beans
Rinse your mung beans thoroughly to remove any dirt or dust. Place them in a bowl and cover with warm water. Gently stir to make sure every bean is moistened. Let them soak for about 4 hours—this jumpstarts the sprouting process by hydrating the beans.
Video : Making bean sprouts at home from plastic bottles is easy – both white and plump
Step 2: Prepare the Bottles
While the beans soak, grab your large plastic bottles and drill several small holes into each cap. These will allow air to circulate, which is essential for healthy sprout growth. If you don’t have a drill, a heated needle or small sharp object works fine.
Step 3: Transfer the Beans
Once soaking is done, cut the top off your small bottle to create a funnel. Use this funnel to evenly distribute the soaked beans into your three large bottles. This helps ensure they have enough space to grow without overcrowding.
Step 4: Keep Them Covered
Put the caps back on the bottles and cover each one with a damp towel. The towel keeps the sprouts in a dark, humid environment, mimicking natural soil conditions without the dirt.
Step 5: Water and Drain Daily
For the next four days, water your beans three times a day. Each time, pour water into the bottle, shake gently to rinse the beans, then drain completely by turning the bottle upside down. Make sure no excess water remains—it can cause mold. After each rinse, re-cover the bottles with the damp towels.
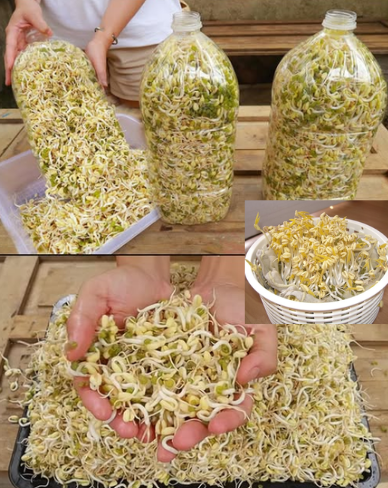
Step 6: Harvest Your Sprouts
By day four, you’ll see thick, crunchy white sprouts filling your bottles. To harvest, carefully cut open the bottles with scissors or a knife. Remove the sprouts, give them a final rinse, and they’re ready to eat.
Pro Tips for the Best Sprouts
- Avoid placing bottles in direct sunlight—sprouts grow best in the dark.
- Keep the environment humid but never soggy.
- Use only clean bottles and fresh beans to prevent bacterial growth.
Video : How To Grow Sprouts at Home | 4 Super Healthy Sprouts
Enjoy Your Fresh Harvest
Add your homegrown bean sprouts to salads for crunch, toss them into stir-fries for texture, or layer them into sandwiches for extra freshness. Not only will you get superior flavor, but you’ll also enjoy the satisfaction of eating something you grew yourself—no garden required.