Why Your Non-Stick Pan Needs Extra Care
Non-stick pans are one of the most reliable tools in the kitchen. They make cooking easier, prevent food from sticking, and save you from endless scrubbing. But over time, improper cleaning, high heat, or neglect can cause their coating to wear down. That’s when your eggs start sticking, sauces burn, and you wonder if it’s time to buy a new pan. The good news? With the right cleaning tricks and a few natural ingredients, you can restore your non-stick pan to near-original condition and extend its life.
The Key Ingredient for Cleaning a Non-Stick Pan
Before tossing out your worn pan, try a gentle cleaning hack that brings it back to life. Non-stick surfaces deteriorate when food residues, oils, and grease build up. Instead of reaching for harsh chemicals or scrubbers that do more harm than good, there’s a simple kitchen-friendly solution that works: coffee grounds.
Coffee Grounds: A Secret Weapon for Your Pan
Don’t underestimate those leftover coffee grounds from your morning brew. They’re slightly abrasive, but still gentle enough to clean non-stick surfaces without causing damage.
How to Use Coffee Grounds:
- Mix two teaspoons of used coffee grounds with a drop of dish soap.
- Wet a soft sponge and dip it into the mixture.
- Gently rub the sponge across the pan in circular motions.
- Rinse thoroughly with warm water and dry with a soft towel.
The natural grit of coffee grounds lifts stuck-on grease and grime, helping the pan’s coating work like new again.
Peanut Oil Method: Restoring Shine and Smoothness
If you don’t have coffee grounds on hand, peanut oil is another excellent option. It not only restores the pan’s non-stick properties but also conditions the surface to prevent future damage.
Steps to Try This Method:
- Clean and dry your pan thoroughly.
- Apply a thin, even layer of peanut oil to the inside surface.
- Heat the pan on the stove for one minute.
- Let it cool, then wash it gently with a soft sponge.
Repeat this method every six months to maintain your pan’s smooth finish and improve its durability.
Video : The EASIEST way to Clean Filthy Pan bottoms (when you don’t like scrubbing)
Coconut Oil for Deep Restoration
For tougher cases, coconut oil combined with heat treatment can bring a pan back to life. This method reseasons the surface and restores its slick, easy-to-clean texture.
How to Do It:
- Place your pan on the stove and heat it slightly.
- Spread a thin layer of coconut oil across the inside.
- Preheat your oven to 150°C (300°F).
- Bake the pan inside the oven for two hours.
- Remove carefully, let it cool, and wipe away any excess oil.
The slow heat allows the oil to bond with the surface, rejuvenating the non-stick layer.
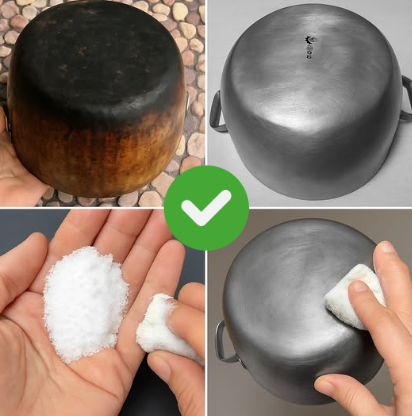
Vinegar and Baking Soda: A Classic Cleaning Combo
When grease buildup and stains won’t budge, vinegar and baking soda can save the day. This duo cuts through residue while neutralizing odors, leaving your pan fresh and functional.
How to Use:
- Pour 250 ml of water into your pan.
- Add two tablespoons of baking soda and 125 ml of white vinegar.
- Wait for the fizzing to stop, then simmer the mixture on low heat for 10 minutes.
- Pour out the liquid, rinse, and dry thoroughly.
This process clears hidden residue and restores smoothness without damaging the coating.
Tips to Extend the Life of Your Non-Stick Pan
- Always use wooden, silicone, or plastic utensils—never metal.
- Avoid cooking on high heat; medium heat preserves the coating longer.
- Hand wash with a gentle sponge instead of running through the dishwasher.
- Re-season your pan occasionally with a thin layer of oil.
Video : How To Clean Burnt Pans (Quickly & Easily!)
Conclusion: Simple Care, Long-Lasting Results
Your non-stick pan doesn’t need to be replaced the moment food starts sticking. With tricks like coffee grounds, peanut oil, coconut oil, and the baking soda-vinegar combo, you can restore its performance and extend its lifespan. A little extra care not only saves you money but also ensures that every meal you cook slides off the pan with ease.
Take a few minutes to revive your non-stick pan, and you’ll be amazed at how much longer it can serve you. Sometimes, the best kitchen upgrades don’t come from buying new tools—but from learning how to take care of the ones you already have.