You’ve boiled a batch of eggs for your salad, only to slice one open and—there it is—a greenish ring around the yolk. It’s harmless, but let’s be honest, it’s not exactly appetizing. You followed your recipe to the letter, so why does it keep happening? And more importantly, how can you stop it for good without turning into a Michelin-starred chef?
Let’s break it down step-by-step so you can finally master hard-boiled eggs that look as good as they taste.
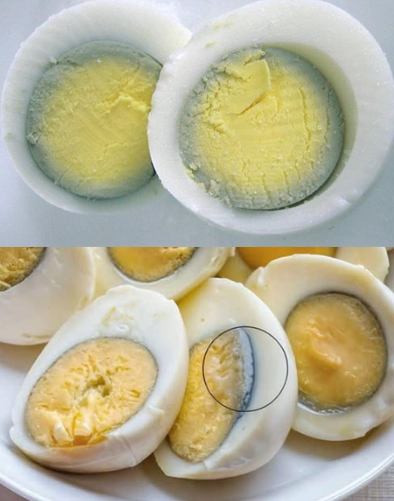
Why Your Hard-Boiled Eggs Turn Green
The green ring isn’t a sign of bad eggs or failed cooking—it’s pure chemistry. When eggs are overcooked, the iron in the yolk reacts with the sulfur in the white, creating a harmless compound called iron sulfide.
While it won’t hurt you, it does give your eggs that unappealing greenish-gray border. Luckily, a few small changes in your cooking process can eliminate it entirely.
Step 1: Start Cold for Perfect Texture
Perfect hard-boiled eggs begin with cold water—not boiling.
- Place your eggs in a single layer in a pot.
- Add cold water until it’s about 1 to 2 inches (3–5 cm) above the eggs.
- Avoid crowding the pot to prevent uneven cooking.
Starting cold allows the eggs to heat gradually, reducing the risk of overcooking and cracking.
Step 2: Heat, Then Stop
Instead of letting your eggs boil away, bring the water just to a rolling boil—then stop the heat immediately.
- Cook over medium heat until bubbles break the surface.
- The moment the water reaches a full boil, turn off the burner.
This prevents the temperature from climbing too high, which is the main culprit behind that green ring.
Video : The Real Reason Why Your Boiled Eggs Turn Green
Step 3: Let Hot Water Do the Cooking
The residual heat in the water is all you need.
- Cover the pot and let the eggs sit in the hot water for 9 to 12 minutes.
- For a slightly soft center, aim for 9 minutes.
- For fully set yolks, go up to 12 minutes.
This gentle method cooks the eggs evenly without overdoing it.
Step 4: Shock Them Cold
The most important step? Stopping the cooking instantly.
- Prepare a bowl of ice water while the eggs are resting.
- Once the time is up, transfer the eggs directly into the ice bath.
- Let them cool for at least 5 minutes.
This not only prevents the green ring but also makes peeling much easier.
Step 5: Peel Like a Pro
Peeling hard-boiled eggs doesn’t have to be frustrating.
- Use eggs that are 5–7 days old; fresh eggs stick more to the shell.
- Peel under running cold water to loosen stubborn bits.
- If you’re storing them, keep them in the shell for up to a week in the fridge. Once peeled, eat within 2–3 days.
Bonus Tips for Foolproof Hard-Boiled Eggs
- Add a pinch of salt or a splash of vinegar to the water to reduce cracking.
- Always cook in a single layer—stacking eggs leads to uneven results.
- If making deviled eggs, let them chill completely before slicing for a cleaner cut.
Video : Why Does the Yolk of an Overcooked Hard Boiled Egg Turn Green
The Secret: Timing and Cooling
Avoiding that green ring isn’t about fancy gadgets or secret ingredients—it’s all about controlling the cooking time and cooling the eggs immediately. Follow this method, and you’ll have hard-boiled eggs that are tender, bright, and picture-perfect every time.
No more guessing, no more green rings—just beautiful eggs ready to upgrade your breakfast, salads, or snacks.


